Sewing Change Sleeve Type On Pattern . Line up the outer shoulder corner of the armscyth and the bottom of the armscyth. Lay the fall in love pattern over the bell sleeve.
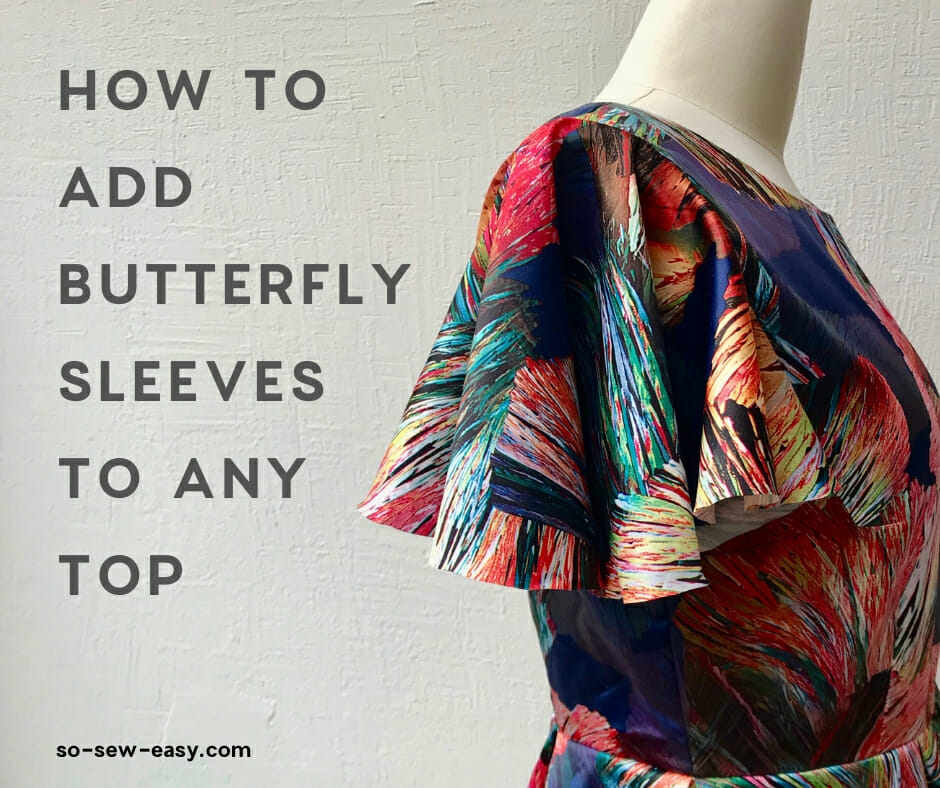
How To Add Butterfly Sleeves To A Top Or Dress So Sew Easy from so-sew-easy.com Cut out the pattern piece. Slash sleeve down the center from top to bottom and spread the desired amount. When the vertical seam line is at the shoulder point then the bodice pattern will not need to do any shaping for the curve of the top of the shoulder. The other one is the shirt sleeve. Now follow the alteration steps above, but making sure that the centre gap you leave still accommodates the extra upper arm width you need, so in my case two inches.
Next, cut the lines, starting with the first. Now follow the alteration steps above, but making sure that the centre gap you leave still accommodates the extra upper arm width you need, so in my case two inches. From the dart point, draw a line equal to the original lower sleeve that crosses the wrist line at the 3/4 inch mark you made. Start by tracing the existing sleeve cap of your pattern piece. Start drafting the custom sleeve pattern. The shape will be similar to 1/2 of a football. See more ideas about sewing sleeves, sleeves pattern, sewing patterns.
Source: i0.wp.com To draft a cap sleeve on the pattern you can follow the same steps as above but there is and an even easier way to do it, once you modified your top. At the bottom of the center cut line, measure down 3/4″ and make a mark. Not every sleeve type will suit you, we all have different shape arms and shoulders and where a ruffle sleeve may look pretty for.
In this post, i'm going to discuss 2 of the most common sleeve alterations, and the sleeve ease formula when working with your own sewing pattens. Not every sleeve type will suit you, we all have different shape arms and shoulders and where a ruffle sleeve may look pretty for. At the bottom of the center cut line, measure down 3/4″ and make a mark.
Source: petitepluspatterns.com Add in your tissue insert, go crazy with the tape and voila, one new pattern piece. 3) starting at the sleeve hem, cut along. If you have a wide cuff, take that extra length into account when measuring.
This sleeve type is a feature of both the girl's and women's pearlie dress & peplum top pdf sewing patterns. Then, work increase row every inch for for a total of 12 increases) then your pattern is in number of inches. Place the center of the lid over the half way point on the horizontal line and use the curve of the lid help you draw a nice curved shape at the top of the sleeve pattern.
Source: cdn.shopify.com I've selected my personal sleeve block, and i've traced it to create a short sleeve. See more ideas about sewing sleeves, sleeves pattern, sewing patterns. Trace off the new back armhole curve and the shoulder seam.
You can make this pattern straight on the cloth or on a paper. 2) using a ruler, draw a line from underarm intersection to underarm intersection, perpendicular to the grainline. Keep the sleeve pieces right sides together.
Source: www.stylearc.com Line up the outer shoulder corner of the armscyth and the bottom of the armscyth. Now follow the alteration steps above, but making sure that the centre gap you leave still accommodates the extra upper arm width you need, so in my case two inches. Slash from waistline to hemline parallel to center back through waistline dart.
Place the center of the lid over the half way point on the horizontal line and use the curve of the lid help you draw a nice curved shape at the top of the sleeve pattern. The shape will be similar to 1/2 of a football. If you have a wide cuff, take that extra length into account when measuring.
Source: www.lovenotions.com 1) start by drawing in all the stitch lines on the sleeve. Your final sleeve piece, without seam allowances will look like this diagram. Starting with the bodice back, take your existing sleeved pattern and lay it over your tracing.
Next, cut the lines, starting with the first. Add in your tissue insert, go crazy with the tape and voila, one new pattern piece. In this tutorial i show you how to correctly adapt a sleeve pattern to make extra space for large upper arms.in this video i use a single hinge point to acco.
Source: threadsmonthly.com Place the center of the lid over the half way point on the horizontal line and use the curve of the lid help you draw a nice curved shape at the top of the sleeve pattern. Slit sleeves are exactly what they sound like—sleeves with a slit down the center. 2) using a ruler, draw a line from underarm intersection to underarm intersection, perpendicular to the grainline.
Curve the sides out to meet the outer edges of the horizontal line. Lay the fall in love pattern over the bell sleeve. Everything in between is what needs to be adjusted.
Source: blog.cashmerette.com Add 1/2 the amount added to the sleeve to the bodice front and back side seam. In this tutorial i show you how to correctly adapt a sleeve pattern to make extra space for large upper arms.in this video i use a single hinge point to acco. The final look of the sleeve depends on where and how much you added the volume.
Take the pattern shape for a marie sleeve, draw in a narrower shape for around the shoulder, and cut it down the center to get your two. Everything in between is what needs to be adjusted. You'll want to take into account how wide the cuff on your pattern is.
Thank you for reading about Sewing Change Sleeve Type On Pattern , I hope this article is useful. For more useful information visit https://greatnesia.com/
Post a Comment for "Sewing Change Sleeve Type On Pattern"